How to Make a Discord Server Private (And Actually Keep It That Way)
A Discord server is public by default in one specific way: anyone with an invite link can join. Most people assume "private" means not listing the server publicly, but that's only part of it. The real work is in the permissions - specifically, what the @everyone role can see and do. Get that wrong and your server is only as private as your invite link, which is a weak guarantee.
Here's how to lock it down properly, step by step.
Quick Answer (For Those in a Hurry)
Go to Server Settings -> Roles -> @everyone and remove View Channels permission. This hides all channels from anyone who joins without an assigned role. Then create a Member role with the access you want, and assign it manually to trusted people. Control your invite links by setting expiry dates and use limits so old links can't be reused.
What This Guide Actually Helps You Do
This guide is designed for readers who want to change privacy or safety settings without misunderstanding what other people can still see. It adds value beyond the basic menu path by explaining which signals are hidden, which ones remain visible, and whether the change affects one conversation, one contact, or the whole account. That matters because privacy features are easy to overestimate, especially when screenshots, notifications, profile visibility, or group behavior still reveal context.
The practical goal is to leave you with a result you can verify, not just a menu path you followed. It also keeps the limits visible: this guide does not pretend to offer total invisibility, message secrecy against screenshots, or a way to bypass another person's privacy settings. It shows the reliable path, the trade-offs, and the checks that help you avoid repeating the same mistake.
Real Situations Where a Private Server Is the Right Choice
Private Discord servers solve a specific problem: you want Discord's functionality without Discord's openness.
You're building a paid community, a course group, or a membership space where access is earned or purchased. A public server - or even a semi-private one with a shared invite link - breaks the model. Members who paid for access shouldn't be sitting next to people who grabbed a leaked link. A properly configured private server means every member is verified before they see a single channel, and no one gets in without explicit approval.
You're using Discord for a work team, a project group, or a small organization that handles sensitive discussions. These conversations aren't meant for the internet. Keeping a server private isn't about paranoia - it's about keeping business discussions, internal planning, or team coordination away from anyone outside the group. The default Discord setup doesn't give you this out of the box, which is why the permission configuration in this guide matters.
You want a personal space - a close friend group, a family server, a tight-knit gaming circle - where the atmosphere is shaped by who's there, not who finds a link. Small private servers often have better conversations precisely because everyone knows everyone. A leaked invite link that lets strangers join changes the dynamic immediately. Proper permission setup means you control the guest list, not the link.
Before You Start: One Thing to Know
Not sharing your invite link publicly is not enough to make a server private. Anyone with a valid link - no matter how they got it - can join unless you've configured @everyone permissions to restrict access. The invite link controls who can enter the door; the @everyone role controls what they can see once they're inside. Both need to be configured. Most "private" servers only address the first and leave the second wide open.
This is the gap that most guides skip, and it's the one that actually matters.
How to Make Your Discord Server Private - Step by Step
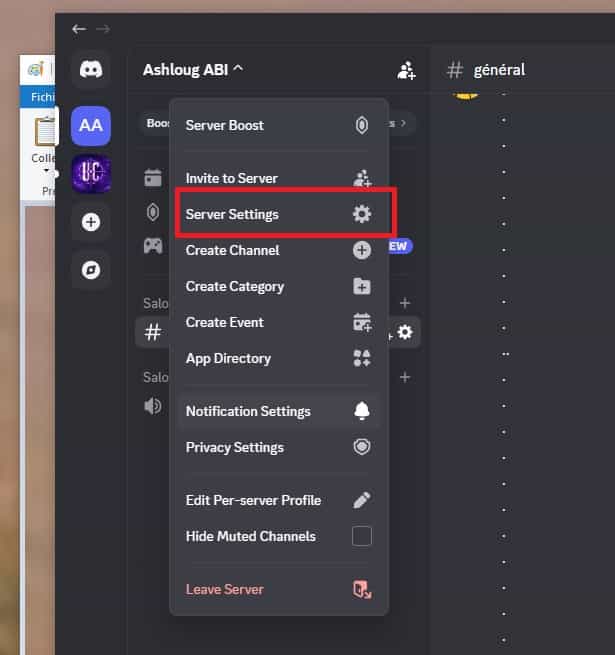
Step 1 - Open Server Settings
Click on your server name at the top of the left sidebar to open the dropdown menu, then select Server Settings.

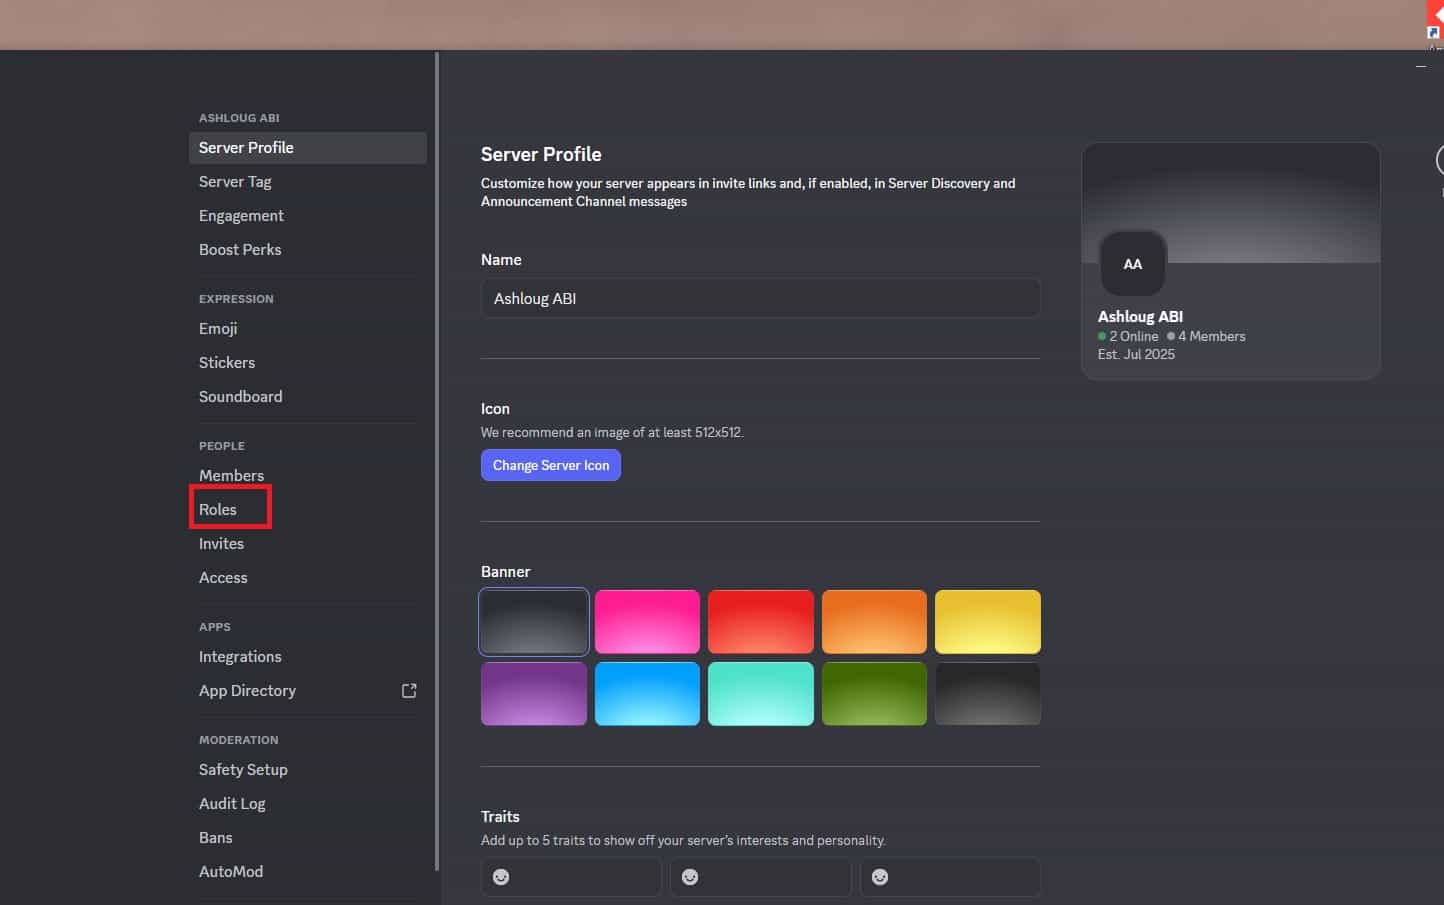
Step 2 - Navigate to Roles
In the left menu of Server Settings, click Roles. This is where you'll configure the @everyone role and create your access structure.
Step 3 - Edit the @everyone Role Permissions
Click on @everyone in the roles list. This is the default role that every single member receives the moment they join - before you've assigned them anything else. Scroll through the permissions and turn off View Channels. While you're here, also disable Send Messages, Add Reactions, and Create Invite. Essentially, @everyone should have no meaningful permissions at all.
Save your changes. At this point, anyone who joins your server through an invite link will see a completely empty server - no channels, no conversations - until you assign them a role.
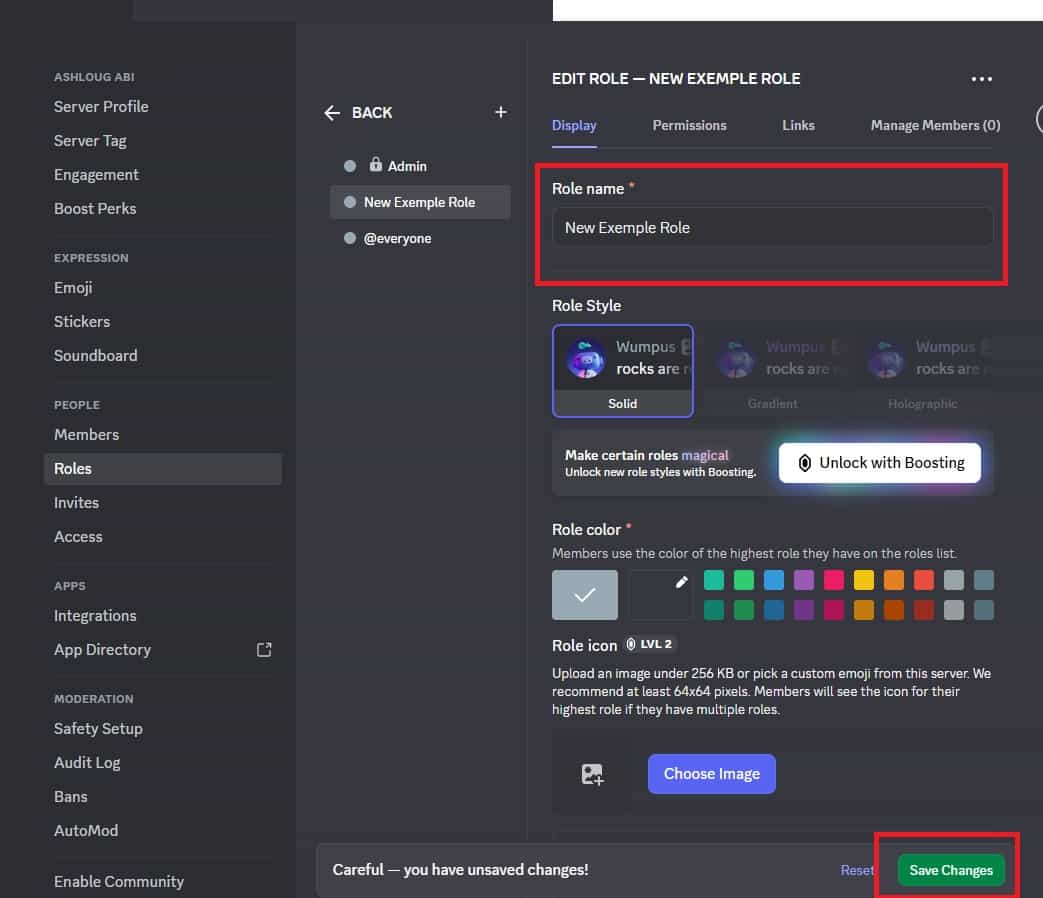
Step 4 - Create a Member Role With Proper Access
Still in the Roles section, click the + button to create a new role. Name it Member (or whatever fits your server). Under this role's permissions, enable the access you want regular members to have - View Channels, Send Messages, Read Message History, Add Reactions, and Connect to voice channels. Save the role.
This role is what you'll assign to people you trust and want to have full access.

Step 5 - Set Up Admin and Moderator Roles
Create additional roles for people who help manage the server. An Admin role with Administrator permission (use this sparingly - it overrides everything) and a Moderator role with permissions to manage messages, kick members, and mute users covers most server management needs without giving everyone full control.
Assign these roles only to people you genuinely trust to manage the community.
Step 6 - Restrict Channel Visibility Per Role
For channels that should only be visible to specific roles - an admin-only planning channel, a moderator log, a VIP section - open the channel settings by clicking the gear icon next to the channel name. Go to Permissions, click the + next to "Roles/Members," add the roles that should have access, and explicitly deny access to @everyone.
This layer of channel-level permissions works on top of the role-level setup, giving you granular control over exactly who sees what.

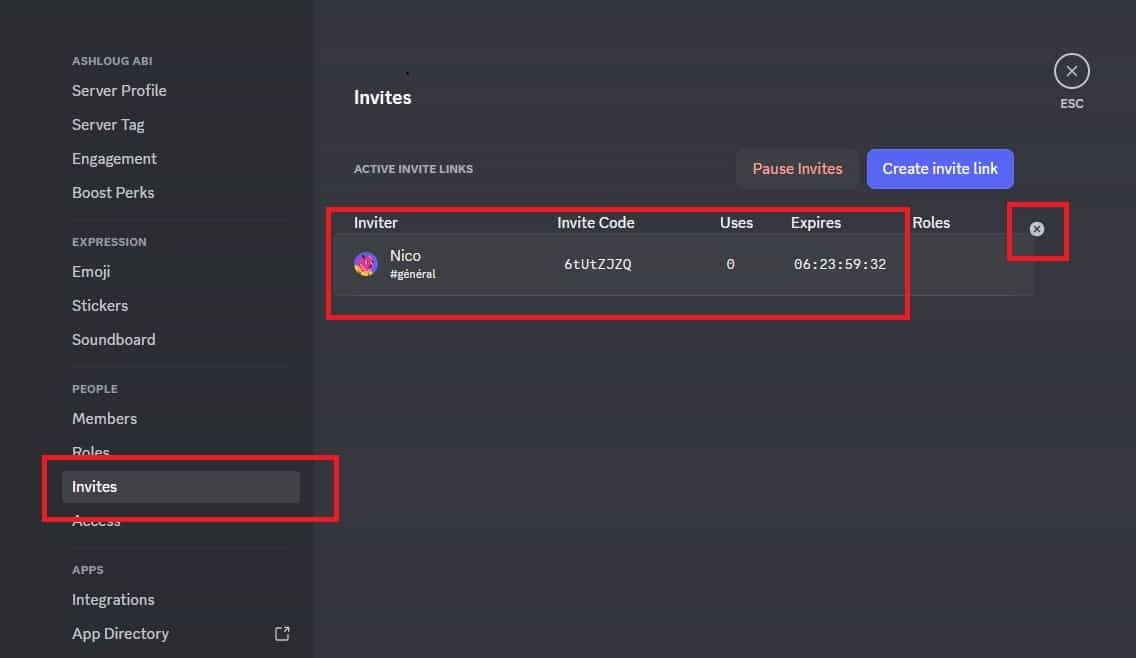
Step 7 - Audit and Manage Your Invite Links
Go to Server Settings -> Invites to see all active invite links. Delete any old or unused links. Going forward, when you create invite links, set an expiration time and a maximum number of uses rather than leaving them open indefinitely. A link that expires after 24 hours or after 10 uses is significantly harder to misuse than a permanent unlimited link.
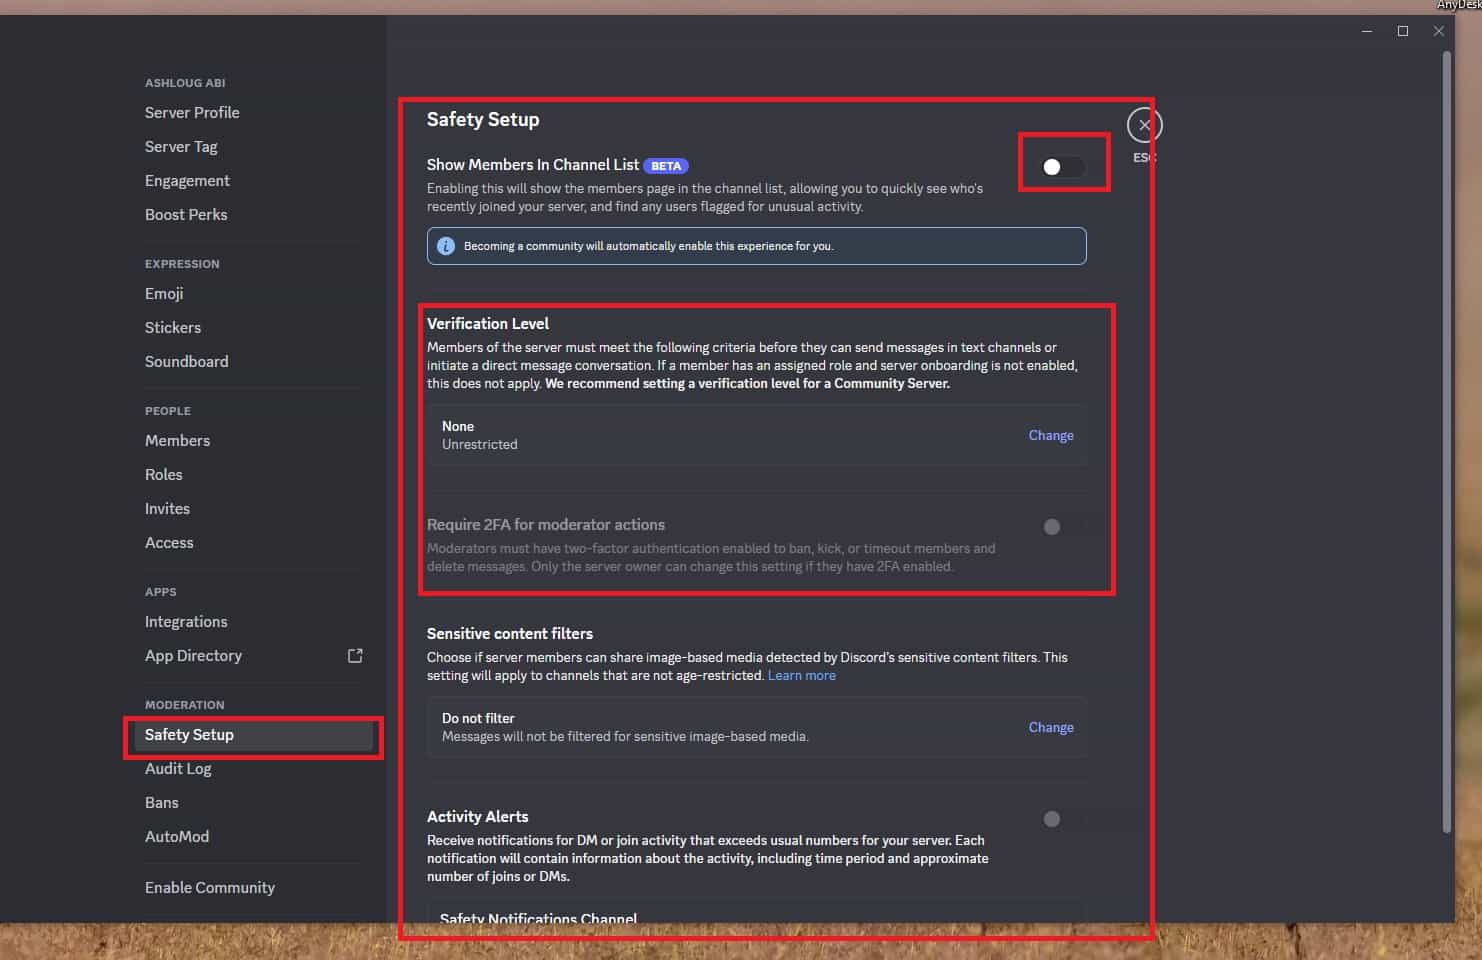
Step 8 - Set the Verification Level
Go to Server Settings -> Safety Setup and set the verification level to at least Low (requires a verified email) or Medium (requires an account older than 5 minutes). For servers handling sensitive content or paid communities, High (phone-verified account) is worth the added friction - it significantly reduces throwaway accounts and ban evasion.
What Changes After Locking Down the Server
Once the @everyone role has View Channels removed, the server behaves fundamentally differently for new joiners. Someone who finds or receives your invite link will enter the server and see nothing - no channels, no messages, no indication of what's inside - until you manually assign them the Member role. This creates a natural checkpoint where you verify who they are before granting access.
For your existing members, nothing changes. They already have their roles assigned and their access remains intact. The permission change only affects the baseline experience of joining without a role.
The trade-off is that approving new members becomes a manual step. Depending on your server size, this can be a five-second task or a time-consuming one. For small private servers this is a feature, not a burden - you know exactly who's in and why. For larger servers, automation through a bot like Carl-bot can handle role assignment after a member completes a verification step.
Advanced Tips: Tightening Access Without Creating Friction
Use a #verification channel as the only visible space for new joiners. Instead of leaving new members in a completely empty server, create one channel - typically called #verify or #welcome - that's visible to @everyone but where members can only read, not write. Post your rules and instructions there, and explain that they need to be verified before accessing anything else. This gives new members something to do while you review and approve them, rather than a confusing blank screen.
Use Carl-bot's reaction roles or button roles for self-serve access to optional channels. Once your core private structure is set up, reaction roles let members opt into channels that aren't relevant to everyone - a games channel, a language-specific channel, a hobby discussion space. This keeps the main server focused while giving members the ability to customize their own experience. It's a way to scale personalization without creating permission complexity.
Create a separate invite link for each entry point so you can track where members came from. Discord lets you create multiple invite links simultaneously. If you share your server in three different places, create three different links with identifying names. When you review the Invites list, you can see which link each member used, which tells you where your community is growing from - and lets you revoke access from a specific source if something goes wrong without affecting everyone else.
Regularly audit your member list and role assignments. Private servers drift open over time as members become inactive, roles get assigned carelessly, or old invite links circulate. Set a reminder once a month to check who's in the server, whether their role assignments still make sense, and whether any invite links should be revoked. Five minutes of maintenance keeps the server as private at month six as it was on day one.
What Private Server Settings Can't Fully Prevent
Even a properly locked-down Discord server has limits that are worth being clear about. Members you've granted access to can screenshot, copy, or share anything they see inside the server. There's no technical barrier to a trusted member screenshotting a private conversation and sharing it outside Discord. Privacy settings control who gets in - they can't control what someone does once they're inside.
Discord itself can also access server content if required by law enforcement or in cases of reported Terms of Service violations. "Private" in Discord's context means private from other Discord users, not from Discord as a platform. If you're handling genuinely sensitive information, this is worth knowing.
Bots added to the server can also read and log messages depending on the permissions they've been granted. Review bot permissions carefully - a moderation bot needs some access, but it shouldn't need more than the minimum required for its function.
Finally, verification levels create friction but not barriers. A determined person can meet Discord's phone verification requirement with a prepaid SIM and create a new account that passes any verification level. These measures stop casual attempts and make ban evasion more annoying - they don't stop someone who genuinely wants to get in.
Frequently Asked Questions
I removed View Channels from @everyone but some members can still see all channels - why? Check whether those members have a role that explicitly grants View Channels. Role permissions stack in Discord - if any role a member has grants access, they get it regardless of what @everyone says. Also check channel-level permissions: a channel can have an explicit "allow" for @everyone that overrides the role-level setting. Open the specific channel's permissions and verify there's no @everyone allow rule that's undoing your server-level restriction.
Can someone see that a server exists even if they can't access its content? Yes. If someone has a valid invite link to your server, they can see the server name and icon on the join screen even if they don't have any channel access once inside. The server's existence isn't hidden by permissions - only its content is. If you want the server to be completely unlisted and undiscoverable, the only reliable method is to never share or generate invite links except to specific individuals you're directly approving.
If I transfer ownership of the server to someone else, do they automatically get all permissions including the ability to change the private settings? Yes. Server ownership in Discord carries every possible permission, including the ability to change any setting, override any role, and delete the server entirely. Transferring ownership is permanent and gives the new owner full unrestricted control. If you want someone to help manage the server without full ownership, assign them an Admin role instead of transferring ownership.
Does setting verification level to High affect existing members? No. Verification requirements apply to new members joining the server, not to people who are already in. Existing members keep their access regardless of when their account was created or whether their phone is verified. This means you can raise the verification level at any time to tighten entry requirements for future joiners without disrupting your current community.
Can a member with the Member role create their own invite links and bypass my controls? Only if you've granted the Create Invite permission to the Member role. If you followed this guide and removed Create Invite from @everyone and didn't add it back in the Member role, regular members cannot create invite links. Only roles with that permission explicitly granted - typically Admin and Moderator - can generate invite links. Verify this by checking the Member role's permissions in Server Settings -> Roles.
What To Verify Before You Finish
A good finish looks like this: the privacy behavior is clear in a real conversation and you know what the other person will still be able to notice. Before moving on, do a small real-world test: try the setting with a trusted contact or secondary device, then compare the visible profile, notification, or message state from both sides.
If someone can still see something you expected to hide, the most likely explanation is that the feature protects only a specific layer of privacy and does not control screenshots, saved media, group history, forwarded content, or old notifications. In that case, use the troubleshooting or limitation section above first, because repeating the same taps usually hides the real cause.
Related Guides
Read next: How to create a Discord server | Add bots to a Discord server | How to Create Discord Channels
Final Thoughts
Making a Discord server private is a two-part job: controlling the invite links and locking down the @everyone role. Most people do the first and skip the second, which leaves the server only as private as a link that can be screenshotted, forwarded, or found. Spend ten minutes on the permissions setup described above and you have genuine access control - not just a server that happens not to be publicly listed.