How to Create a Discord Server (And Set It Up So People Actually Stay)
Creating a Discord server takes about two minutes. Creating one that people actually use, come back to, and invite others into takes a bit more thought - mostly in the first ten minutes of setup. The decisions you make before your first member joins determine whether the server feels like a real community or an empty room with too many channels nobody posts in.
Here's how to do both: the quick technical setup, and the structural choices that make the difference.
Quick Answer (For Those in a Hurry)
Open Discord, click the + icon in the left sidebar, select Create My Own, choose whether it's for friends or a larger community, give it a name, and click Create. Your server is live immediately with a default text channel and a voice channel. From there, customize channels, set roles, and share your invite link from the server name menu.
What This Guide Actually Helps You Do
This guide is designed for readers who want to set up a channel, group, or community space that works for real people after the first day. It adds value beyond the basic menu path by explaining who should be able to join, who can post, what permissions members need, and how moderation will stay manageable. That matters because new communities often fail because the setup looks finished but roles, invites, rules, and posting permissions are unclear.
The practical goal is to leave you with a result you can verify, not just a menu path you followed. It also keeps the limits visible: this guide does not pretend to offer instant growth, automatic engagement, or a community that moderates itself without clear structure. It shows the reliable path, the trade-offs, and the checks that help you avoid repeating the same mistake.
Real Situations Where Having Your Own Server Makes Sense
Discord servers aren't just for large gaming communities - there are three specific scenarios where having your own makes a genuine practical difference.
You have a recurring group - a friend circle, a study group, a team - and you're tired of coordinating across multiple platforms. A shared Discord server puts everything in one place: text channels for different topics, voice channels for live calls, and a persistent history that everyone can scroll back through. No more "wait, was that in the group chat or the other group chat?" A well-organized server becomes the single place the group actually lives.
You create content - YouTube, Twitch, a newsletter, a podcast - and want a direct channel to your audience that you actually control. Social media platforms change their algorithms, their reach, their policies. A Discord server gives you a space where your audience can gather, where you control the rules, and where a message from you actually reaches the people who opted in. It's the difference between renting attention on someone else's platform and owning a space where your community comes to you.
You're running something that needs ongoing coordination - a project, an event, a game - and email threads have become unmanageable. Discord's channel structure lets you separate different workstreams cleanly: one channel for announcements, one for questions, one for the actual work discussion. Voice channels let you jump into a call without scheduling anything. For anything that lasts more than a week and involves more than five people, a Discord server is usually the right infrastructure.
Before You Start Building: One Thing to Know
The biggest mistake people make when creating a Discord server is adding too many channels before they have enough members to fill them. An empty server with fifteen channels looks abandoned. A focused server with three active channels looks alive. Start with the minimum - a welcome channel, a rules channel, and one general chat - and add channels only when the existing ones are actually being used. You can always expand; you can't easily contract without making people feel like something was taken away.
Structure grows naturally when a community needs it. Building the structure in advance and then hoping the community shows up to fill it almost always fails.
How to Create a Discord Server - Step by Step
Step 1 - Open Discord and Click the Add Server Button
Open Discord on desktop, mobile, or browser. In the left sidebar, look for the + icon below your existing servers (or at the bottom of the sidebar if you have none). Click it to open the server creation menu.
Step 2 - Choose "Create My Own"
Discord will show you templates - Gaming, Study Group, Friends, and others. Unless you have a specific reason to use a template, select Create My Own. Templates add pre-built channels that often don't match what you actually need, and they're harder to clean up than starting fresh.
Step 3 - Select the Server Type
Discord asks whether the server is For me and my friends or For a club or community. The main practical difference is that "For a club or community" unlocks Community features like announcement channels and member screening. For most small servers, choosing "For me and my friends" keeps things simpler. You can enable Community features later if you need them.

Step 4 - Name Your Server and Add an Icon
Type a name for your server. Keep it clear and recognizable - this is what members see in their sidebar every time they log in. Optionally upload an icon by clicking the camera placeholder. An icon isn't required, but it makes the server easier to identify visually in a crowded sidebar.
Click Create when you're ready.
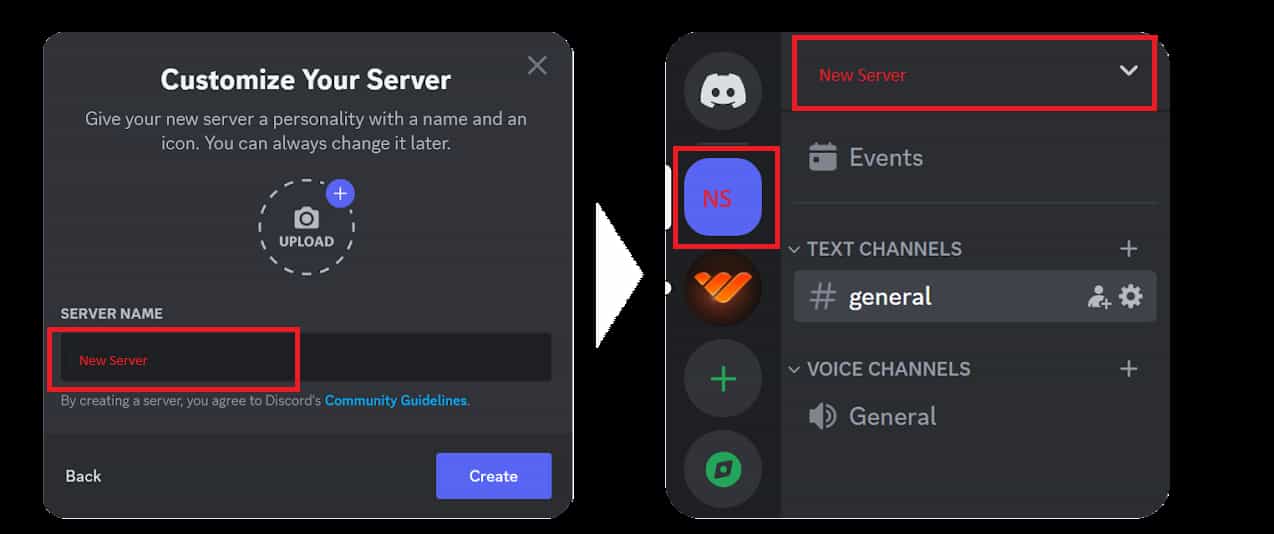
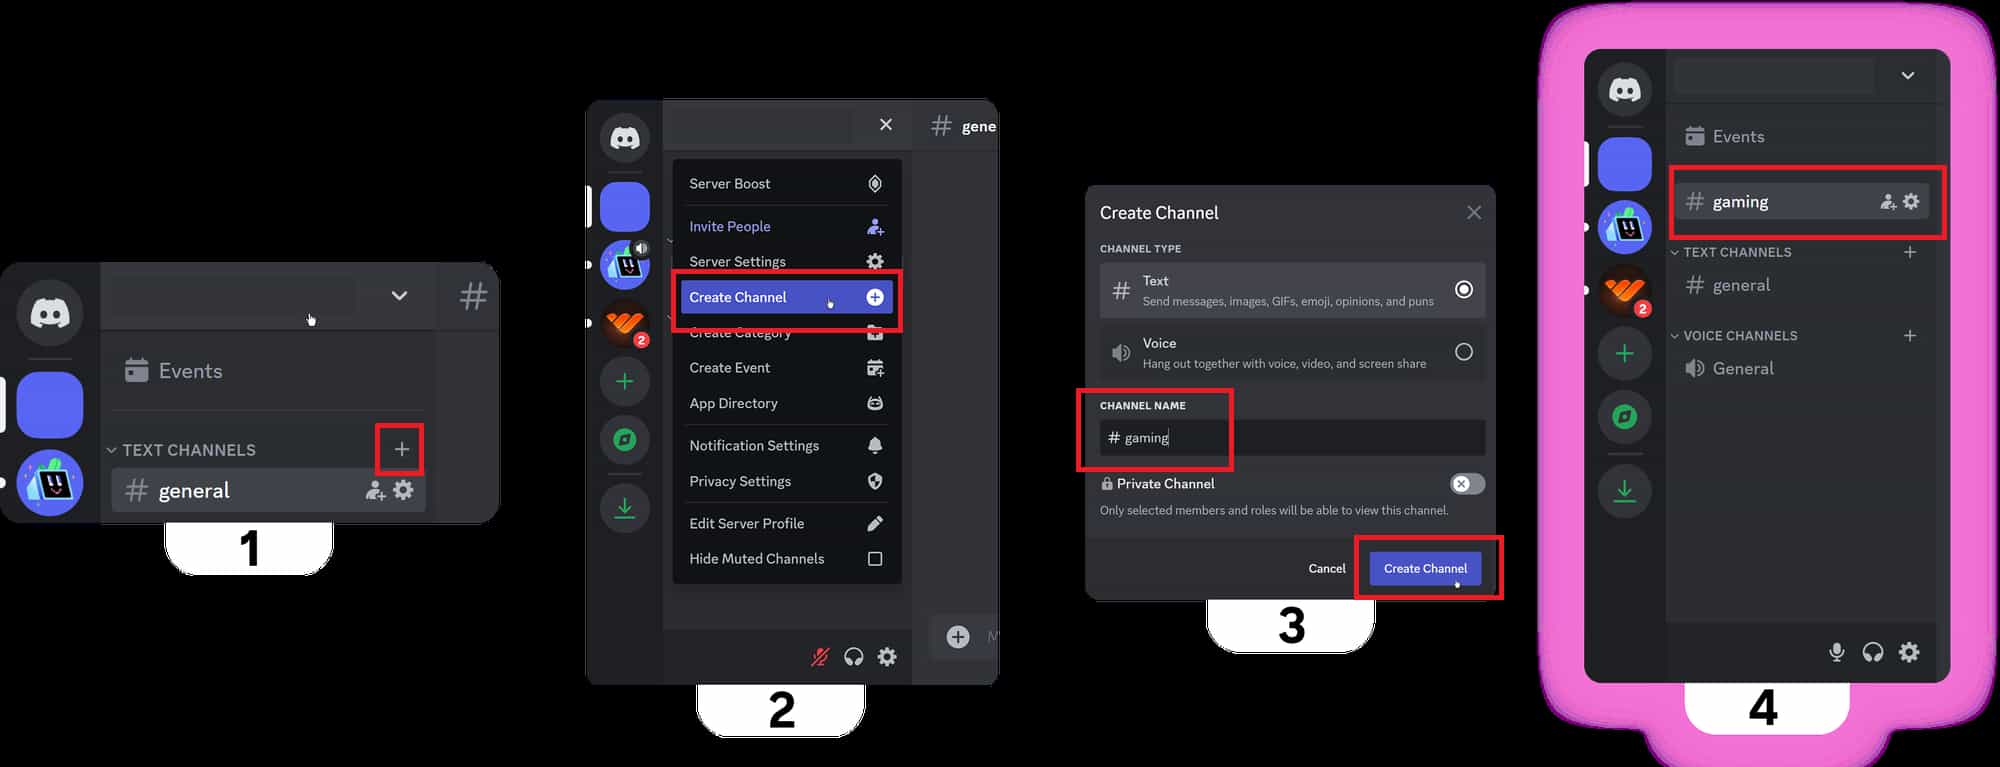
Step 5 - Set Up Your Initial Channels
Your server starts with a default #general text channel and a General voice channel. Before inviting anyone, spend a few minutes organizing this. Rename the default channels if needed, and add only the channels you actually need right now.
A clean starting structure for most servers: a #welcome channel where you post an introduction, a #rules channel with your community guidelines, a #general channel for open conversation, and one voice channel for calls. That's genuinely enough to start.
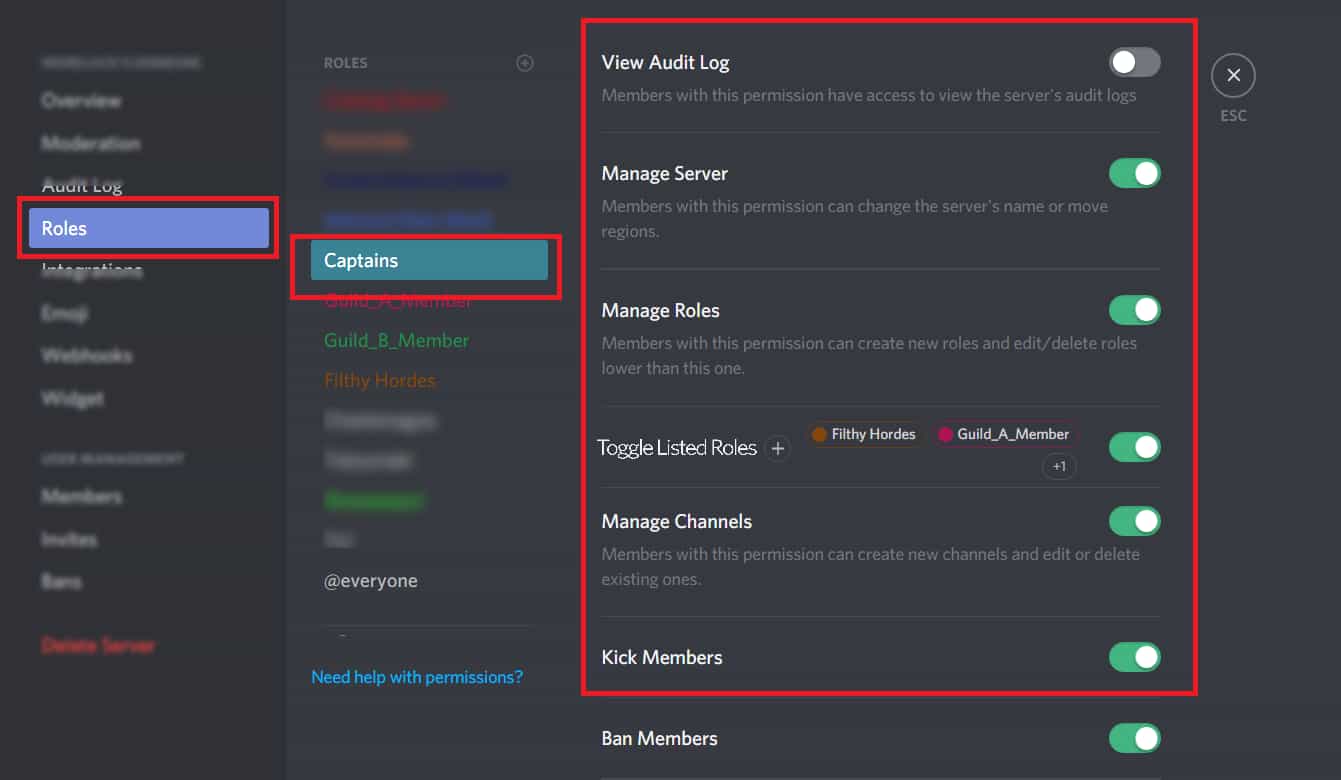
Step 6 - Create Roles and Set Permissions
Click on your server name at the top of the sidebar, go to Server Settings -> Roles, and create the roles you need. At minimum, most servers benefit from an Admin role (full control), a Moderator role (can manage messages and members but not server settings), and a default Member role that everyone gets automatically.
Assign each role appropriate permissions under the Permissions tab. The default @everyone role should have limited permissions - members should earn additional access through assigned roles, not have it by default.
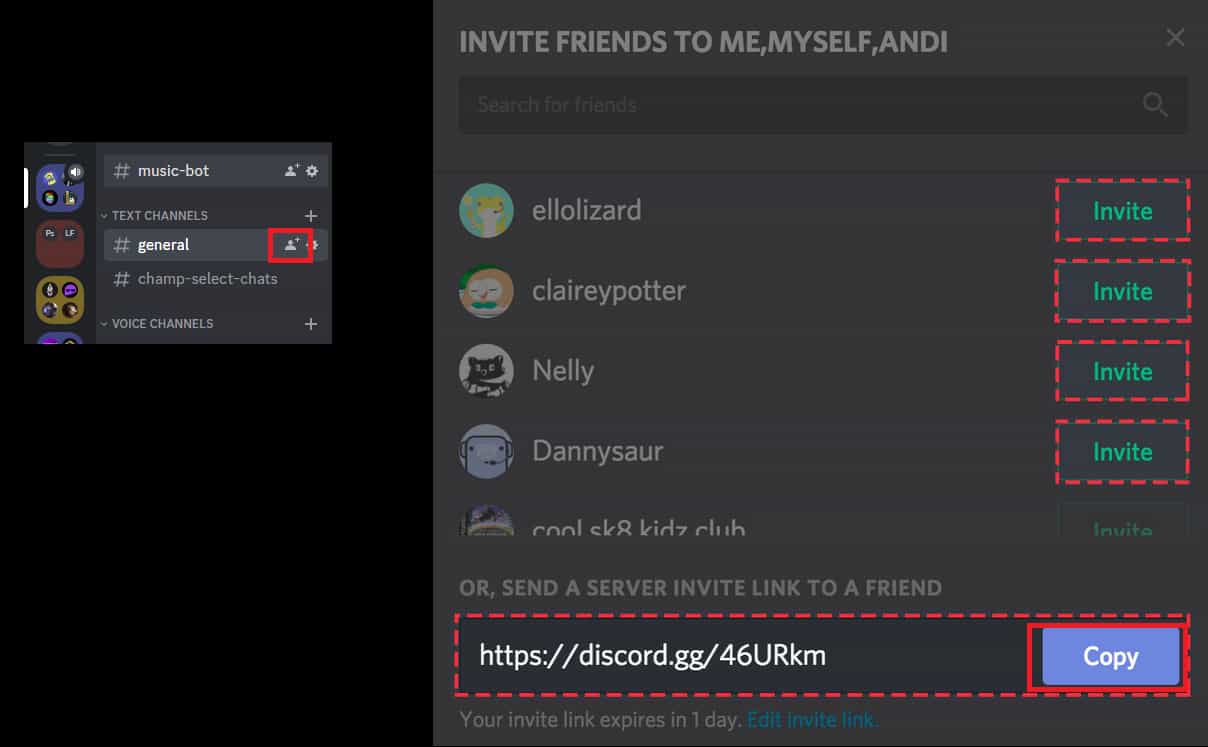
Step 7 - Invite People to Join
Click your server name and select Invite People. Discord generates a shareable invite link. By default, links expire after 7 days - if you want a permanent link, click Edit invite link and set the expiry to Never.
Share the link wherever your intended members are. For private servers, share it only with specific people. For public communities, you can post it in relevant spaces or eventually list the server on Discord's Discovery feature.
What Changes Once Your Server Is Live
The moment you share the invite link and people join, the server starts taking on a character of its own. Your first few messages as the creator set the tone - a brief welcome message and a clear explanation of what the server is for is worth more than an elaborate channel structure. People need to understand within thirty seconds why this server exists and whether it's relevant to them.
As an owner you have full administrative control: you can create and delete channels, assign and remove roles, kick or ban members, and adjust every setting. This level of control is permanent and can't be taken from you unless you transfer ownership to someone else. Moderators you promote can help manage day-to-day activity, but they can't change server settings or affect other staff members.
New messages, reactions, and voice activity all generate notifications for members by default - which can quickly become overwhelming in an active server. Most members will mute channels or the entire server after the first wave of activity. This is normal behavior, not a sign of disengagement.
Advanced Tips: Building a Server That Grows
Use channel categories to organize related channels visually without creating too many. Categories are collapsible headers that group channels together - for example, a "Community" category containing #welcome, #rules, and #introductions, and a "Discussion" category containing your topic channels. This keeps the sidebar readable as the server grows without requiring members to scroll through a long flat list. Right-click in the channel area and select Create Category to add one.
Set up a #rules channel and make it the first thing new members see. In Server Settings -> Community (if enabled), you can require members to accept rules before gaining full access. Even without the formal gate, having a visible #rules channel that's pinned or linked in the welcome message signals that the server is moderated and sets expectations immediately. Servers without visible rules tend to attract behavior problems faster.
Add the Carl-bot or MEE6 bot for basic moderation and automation without paying for anything. Both bots are free at the basic tier and handle auto-moderation (filtering spam and bad language), welcome messages, role assignment, and logging. Adding one early - before the server is large enough to need it - means the infrastructure is already in place when you do. Invite Carl-bot at carl.gg or MEE6 at mee6.xyz and follow their setup wizard.
Create a #bot-commands channel and restrict bot interactions to it. Most bots respond to commands that can clutter your main channels if used anywhere. Create a dedicated channel for bot commands and configure your bots to only respond there. This keeps your main conversation channels clean and makes the bot functionality easy to find for members who want to use it.
What Discord Servers Can't Do Well (Yet)
Discord is built for real-time conversation and voice, and it shows in the gaps. Long-form content - documentation, persistent resources, organized knowledge bases - doesn't live well in Discord. Things get buried in chat history quickly, and there's no native way to pin or surface important information beyond pinned messages (which most people ignore) and channel descriptions. If your community needs to reference documents, guides, or resources regularly, a separate wiki or pinned Google Doc linked in the server works better than trying to keep that information inside Discord itself.
Discord also doesn't have great tools for one-to-many communication to a large audience. Announcement channels help, but the notification control is on the member side - you can't guarantee anyone sees a message. For time-sensitive announcements that everyone needs to see, Discord is less reliable than email.
Server discovery is limited unless you qualify for and apply to Discord's Discovery feature, which requires at least 500 members and an active server with Community enabled. Before that threshold, growth is entirely word-of-mouth and manual promotion. This is worth knowing upfront - Discord doesn't bring members to you the way YouTube or Google can.
Finally, the free tier has storage limits for file uploads and no video hosting. Large files need to be linked from external storage rather than uploaded directly, which adds friction for communities that share a lot of media.
Frequently Asked Questions
If I delete a channel by accident, can I recover the messages that were in it? No. Deleted channels and their message history are permanently gone - Discord has no trash or recovery system for channels. If you need to remove a channel but want to preserve its history, archive it by making it visible only to admins rather than deleting it outright. This keeps the history accessible to you without cluttering the member-facing server.
Why can some members see channels they shouldn't have access to? This is almost always a permissions issue with the @everyone role. By default, @everyone has read access to all channels. To restrict a channel to specific roles, go to the channel's settings, open Permissions, remove the @everyone permission, and add only the roles that should have access. If @everyone still has "View Channel" enabled at the server level, it overrides individual channel restrictions - check your server's default role settings first.
Can I move my server to a different Discord account if I want to change ownership? Yes. Go to Server Settings -> Members, find the member you want to transfer ownership to, click the three dots next to their name, and select Transfer Ownership. This is permanent - once transferred, you lose owner status and can't reclaim it without the new owner transferring it back. Make sure you're transferring to a trusted account.
My invite link isn't working for people trying to join - what's wrong? The most common causes are an expired link (the default expiry is 7 days), a maximum use limit that's been reached, or the server being set to require member verification that the new member isn't completing. Generate a fresh invite link with no expiry and no use limit to rule out the first two. For verification issues, check Server Settings -> Safety Setup and lower or disable the verification requirement temporarily to test.
Does creating a Discord server affect my personal Discord account in any visible way? No. Creating a server doesn't appear on your public Discord profile or notify anyone. The server exists independently of your personal account's visibility - unless you explicitly share the invite link, nobody will know the server exists. Your username, avatar, and profile remain the same regardless of how many servers you own.
What To Verify Before You Finish
A good finish looks like this: a new member can join, understand where to go, and interact only in the places you intended. Before moving on, do a small real-world test: enter the space from a normal member account or ask a trusted user to test joining, posting, reading, and leaving.
If members cannot access the right place, post in the wrong place, or get confused by the layout, the most likely explanation is that permissions, invite settings, channel visibility, role order, or the channel structure need to be adjusted before promotion. In that case, use the troubleshooting or limitation section above first, because repeating the same taps usually hides the real cause.
Related Guides
Read next: How to Make a Private Discord Server | Add bots to a Discord server | How to Create Discord Channels
Final Thoughts
The technical part of creating a Discord server is genuinely easy - the form asks for a name and you click Create. The part that takes judgment is the first ten minutes after: choosing a minimal channel structure, writing a clear welcome message, and resisting the urge to build out every feature before you have people to use them. Start small, stay active in the early days, and let the server grow into what your community actually needs rather than what you imagined it might need.